Wednesday, July 2, 2014

American Flag Placemat

There's still time to stitch these up in time for the weekend!


I used Red Heart yarn and size I (5.50mm) hook and got a finished size of 13" x 19". I like my placemats a bit bigger, if you want them a bit smaller, maybe try the next hook size down. You will want to use a lighter weight yarn or crochet thread with the appropriate size hook for the stars so they will all fit. Alternatively, you could use a worsted weight yarn and make one large star in place of the 5 small ones using the pattern from my 4th of July Star Lovey.

Pattern:
(with red) ch 62
Row 1: sc in 2nd ch from hook, *hdc in next ch, sc in next ch, repeat from * to end of row, turn
Row 2: ch 2 (counts as first hdc), *sc in next hdc, hdc in next sc repeat from * to end of row, turn
Row 3: ch 1, *sc in next hdc, hdc in next sc, repeat from * to end of row, turn

Switch to white
Row 4: repeat row 2
Row 5: repeat row 3
Row 6: repeat row 2

Switch to Red
Row 7: repeat row 3
Row 8: repeat row 2
Row 9: repeat row 3

Switch to white
Row 10: repeat row 2
Row 11: repeat row 3
Row 12: repeat row 2

Switch to Red
Row 13: repeat row 3
Row 14: repeat row 2
Row 15: repeat row 3

Switch to white
Row 16: repeat row 2
Row 17: repeat row 3
Row 18: repeat row 2

Switch to Red
Row 19: repeat row 3, working the first 40 stitches with red, then switch to blue and work the last 21 stitches
Row 20: repeat row 2, working the first 21 stitches with blue, then switch to red and work the last 40 stitches
Row 21: repeat row 3, working the first 40 stitches with red, then switch to blue and work the last 21 stitches

Row 22: repeat row 2, working the first 21 stitches with blue, then switch to white and work the last 40 stitches
Row 23: repeat row 3, working the first 40 stitches with white, then switch to blue and work the last 21 stitches
Row 24: repeat row 2, working the first 21 stitches with blue, then switch to white and work the last 40 stitches

Switch to Red
Row 25: repeat row 3, working the first 40 stitches with red, then switch to blue and work the last 21 stitches
Row 26: repeat row 2, working the first 21 stitches with blue, then switch to red and work the last 40 stitches
Row 27: repeat row 3, working the first 40 stitches with red, then switch to blue and work the last 21 stitches

Row 28: repeat row 2, working the first 21 stitches with blue, then switch to white and work the last 40 stitches
Row 29: repeat row 3, working the first 40 stitches with white, then switch to blue and work the last 21 stitches
Row 30: repeat row 2, working the first 21 stitches with blue, then switch to white and work the last 40 stitches

Switch to Red
Row 31: repeat row 3, working the first 40 stitches with red, then switch to blue and work the last 21 stitches
Row 32: repeat row 2, working the first 21 stitches with blue, then switch to red and work the last 40 stitches
Row 33: repeat row 3, working the first 40 stitches with red, then switch to blue and work the last 21 stitches

Row 34: repeat row 2, working the first 21 stitches with blue, then switch to white and work the last 40 stitches
Row 35: repeat row 3, working the first 40 stitches with white, then switch to blue and work the last 21 stitches
Row 36: repeat row 2, working the first 21 stitches with blue, then switch to white and work the last 40 stitches

Switch to Red
Row 37: repeat row 3, working the first 40 stitches with red, then switch to blue and work the last 21 stitches
Row 38: repeat row 2, working the first 21 stitches with blue, then switch to red and work the last 40 stitches
Row 39: repeat row 3, working the first 40 stitches with red, then switch to blue and work the last 21 stitches


You can finish off and weave in ends after row 39 if you like, or work a border of sc in blue evenly around all 4 sides as shown in the 1st photo.

Star Pattern:
with white, make 5
start with MR
Rnd 1: ch3, 14 dc into ring, sl st to top of beg ch2 to join, pull yarn tail to close ring
Rnd 2: *ch6, sc in 3rd ch from hook, hdc in next ch, dc in next ch, tr in last ch, sk next 2 dc on rnd 1, sl st in next dc (star point made)
Repeat from * for remaining 4 star points, sl st to the bottom of the 1st ch6 to join
finish off, leaving a length of yarn to sew star to placemat

Thanks for reading, I hope you will enjoy this pattern. If you have any questions, comments, or find any errors in the pattern please let me know by leaving a comment below.

Have a happy and safe 4th weekend!
Julie

Monday, June 30, 2014

4th of July Star Lovey


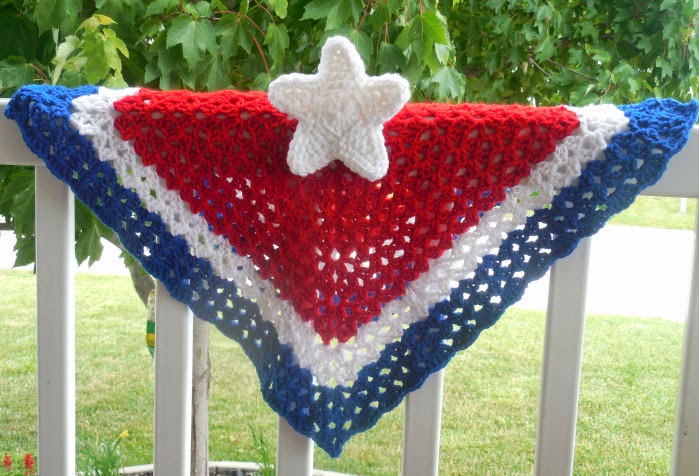
I just love how this project turned out! For the blanket part, I followed the You Are My Sunshine pattern by Cre8tion Crochet, working 10 rows red, 2 rows white, 2 rows blue, and the border round in blue. For the star, I made 2 with white and stitched them together with wrong sides together (pattern below). I used an I hook and Red Heart yarn, mine completed measures approximately 20" square.


Star Pattern

Make 2
(with 2 strands white held together)
Start with MR
Rnd 1: ch 3, 14 dc into ring, sl st to top of beg ch 3 to join, pull yarn tail to close ring.
Rnd 2: *ch 6, sc in 3rd ch from hook, hdc in next ch, dc in next ch, tr in last ch, sk next 2 dc on rnd 1, sl st in next dc (star point made) 
Repeat from * for remaining 4 star points, sl st to the bottom of the 1st ch 6 to join.
Border: ch 1, sc in each stitch around, working 3 sc in the tip of each point, sl st to 1st sc to join. finish off, weave in ends

With wrong sides (back sides) together, using a yarn needle and length of white yarn, stitch 2 stars together and attach to center of blanket/lovey.


Thanks for reading, and I hope you enjoy this project! :)

Monday, April 14, 2014

Autism Awareness Blanket

I finally finished this blanket for a girl at work. It took the better part of 2 months to complete. I changed the pattern up a couple times, and actually learned to crochet left handed on this one so I wouldn't have to turn after each row. I think she is going to be happy with the final result! :)


Wednesday, October 3, 2012

Cool Fall Flower Headbands


These are just a couple of our products up for sale over on our Facebook Page! They can be made in any color or size :)


New Project: Bunny Hat Free Pattern

Well to start with a side note, I'm sitting here at 3am eating this egg-less cookie dough I found the recipe for over at Siriously Delicious :) And I decided I'd share this with y'all. Isn't it cute?


I was inspired by a friend to create a cute little newborn bunny hat today. It worked up in about 30 minutes for me. Unfortunately, my son's noggin is too big to fit into this little thing. I'll have to make one just his size next!

I used this chunky yarn newborn hat pattern at Alli Crafts. I love her patterns! They are very easy to follow. I then made up the ear pattern myself. You can add or remove rows or number of stitches to change the shape and length of the ears.

I used Deborah Norville Serenity Chunky Solids Yarn in Pristine with hook size K
hdc: half double crochet
sc: single crochet
ch: chain

Ears (make two)
Ch 5
Row 1: hdc in second ch from the hook and each ch across, ch 2, turn
Row 2-4: hdc in each stitch across, ch 2, turn
Row 5: hdc decrease twice, ch 2, turn
Row 6: hdc decrease once, ch 1
sc evenly around the edge of entire ear and finish off

Sew your ears on your hat and weave in all loose ends!

I made the ears more rounded. If you'd like more definition, sc twice in each corner. I've heard to make bunny ears a bit more sturdy, you can use pipe cleaners. Crochet them into the edge of the ears so they can bend any which way and stay there. I would have tried this if we had any in the house. I plan to try this trick with my next bunny hat though :)

That's it!
Thanks for visiting :)

Sunday, July 29, 2012

Today: homemade baby food

I know this isn't crochet related but I found this cool way of making/storing baby food on Pinterest and thought I'd post it for any mommies out there.

I chose to make carrots and broccoli today (the broccoli is still in the process of steaming) I also chose to steam my veggies in order to keep in as many nutrients as possible.


When the carrots were fork tender, I mashed them with a fork to about the consistency of stage 3 store bought baby food. If you're making stage 1or 2 baby food it's easiest to use a food processor or emulsifier. I used the water left in the pot (that's adhere the nutrients are) from steaming to thin out the mash a little bit.


Pour your mixture into an ice tray and toss them on the freezer for a couple hours or until you're able to pop the cubes from the tray easily.


You can then store the little baby food cubes in a freezer baggie or tupperware container.

Tuesday, July 10, 2012

New Project - Cookie Monster Blanket :)

So a friend of mine is having a baby boy soon (like tomorrow lol) and her theme is Sesame Street. So I decided to make a cookie monster themed hooded afghan!

I'm only about 1/4 of the way done (I was halfway done but didn't like the stitch so I took it apart) but here is what I'm doing so far..

I'm using royal blue yarn with a size G hook. I was doing a HDC v-stitch but decided to use the "crunch stitch" instead. Here is how:

Crunch Stitch (Multiple of 2 + 1 ch)
Chain 25 loosely
Row 1: slip st loosely in third ch from hook (hdc in next ch, slip st loosely in next ch) across.
Row 2: (right side) Ch 2, turn; skip first slip st (slip st loosely in next hdc, hdc in next slip st) across to last slip st, slip st loosely in top of turning ch.
Repeat row 2 for pattern

Here is what it ends up looking like..